This document describes the use of scripts to simplify the processing of deep sky astrophotos using Iris software. Iris is a very powerful image processing application developed by Christian Buil and made available by him at no charge to the public. To read about Iris software and download the application, visit the Iris Software website.
This document would not exist except for the work done by Jim Solomon to develop a "cookbook" for processing deep sky images with Iris software. The techniques described in this document are all described fully in Jim Solomon's Astrophotography Cookbook.
My contribution to this process is simply a set of five scripts that provide some automation to simplify the processing of a set of images according to the procedures developed by Jim Solomon. You will find a link to a ZIP file containing the five scripts at the bottom of this page. I take no credit for the procedures themselves, as they follow Jim Solomon's cookbook very closely. I recommend that you read the information and run through the cookbook process a time or two before attempting to use these scripts. And keep in mind that the real power of Iris for astrophotography image processing lies in the user's ability to control every aspect of the image processing, so in a sense using scripts such as the ones I created defeats the purpose. While these scripts simplify the use of Iris, the greatest advantage will be realized by learning the nuts and bolts of Iris and using its power to extract the best possible result from each set of images you process.
The scripting capabilities in Iris are rudimentary. Scripts are run from the command window by typing the command run <scriptname>, where <scriptname> is the name of a file containing a sequence of Iris commands, without the file extension. The required extension for files containing Iris scripts is .pgm, so if you have created a script file named iris_script.pgm, you would run it in Iris by typing run iris_script in the Iris command window.
You can pass parameters to Iris scripts by typing them after the script name in the command window. For example, the command run iris_script 20 will execute the script contained in the file iris_scripts.pgm, passing the parameter "20" to the script.
The only program control feature available in Iris scripts is the ability to suspend execution of a script and prompt the user to perform an action, then resume execution. The prompt presented to the user can only be one word - spaces aren't allowed. The procedure in Jim Solomon's cookbook requires user interaction at several points that cannot be automated. When executing my scripts, Iris will prompt you when your interaction is needed, and the procedure that follows describes the actions you should take before resuming the scripts by clicking the "OK" button.
My scripts are available as a zipped archive that you can download by clicking on the link at the bottom of this page.
Step by step
Acquire your images. The cookbook includes very detailed descriptions of the various images needed for the process: lights, flat lights, flat darks and darks. Refer to the section titled "Acquisition" in the cookbook, which starts about 1/4 down from the top.
This process requires all four types of images. In addition, the number of flat lights must be equal to the number of flat darks. Since this process does not scale the darks, the exposure time and ISO setting for the darks must be the same as for the lights, and the ambient temperature for the darks and the lights should be the same as nearly as possible.
This process does not use bias or offset frames. The cookbook provides a very good explanation of why they aren't needed.
There is one more requirement regarding image acquisition - the images must be acquired in RAW mode. The Iris Cookbook processing method, and my scripts which are based on that method, will only work with RAW images.
Configure Iris. Iris must be configured before you use it for the first time. The configuration steps are described in the cookbook, in the paragraph titled "Iris Setup" in the "Processing" section, beginning about 1/2 down from the top.
In addition to the settings noted in the cookbook, you need to specify a folder for the scripts in the "Settings" panel, and you need to copy the scripts downloaded from this web page into that folder.
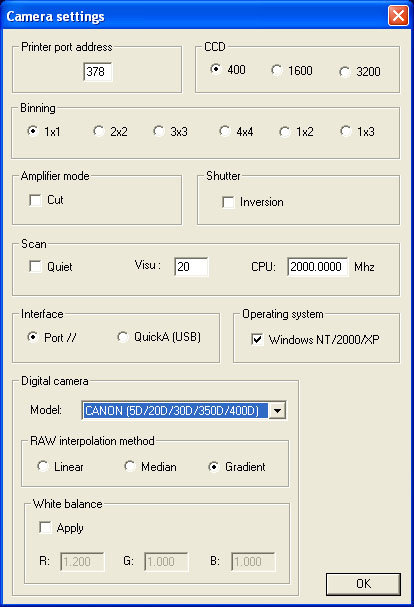
I have included screen shots of my "Settings" and "Camera Settings" panels from Iris. The Working path, Script path, File type, Binning, Raw interpolation method and White balance settings are most important. Be sure you set the File type to PIC, Binning to 1x1, Raw interpolation method to Gradient, and leave the Apply checkbox under White balance unchecked.

Convert your raw flat lights and flat darks. The raw image files must be converted to the Iris PIC format before they can be processed. Follow steps 1 and 2 in the cookbook under the title "Create Master Flat" in the "Processing" section. Be sure to name the PIC sequences as described in the cookbook - fl for the flat lights and fd for the flat darks.
Run the script to create the master flat image. In the Iris command window, type the following command:
run 01_make_master_flat N, where N is the number of flat lights (and flat darks) in your image set.
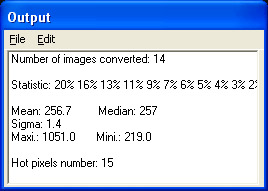
During the master flat creation, you will be prompted with the message "find_hot_flat_dark". The script needs to know a threshold for hot pixel detection in the flat darks. In the Iris Output window, you will see the statistics for the current image, which is the median-combined flat dark. Multiply the sigma value times 16 and add it to the mean value, then type the following command:
find_hot flat-cosmetic X, where X is the calculated threshold value.
Iris will analyze the flat dark image for hot pixels and report the number it found. Below is an example of the output window at this step:
Now click the "OK" button on the prompt panel and Iris will continue processing the flats. When finished, it will display a prompt window with the message "Master_Flat_Done!". Click the OK button on the prompt window.
Your master flat image will now be displayed in Iris, but chances are it will appear completely white. To see a more reasonable representation of the master flat, click the "Auto" button on the Threshold panel (if the Threshold panel is not visible, click the Threshold icon on the tool bar, fourth icon from the left). Iris will adjust the visualization levels so that you can more easily see the image. Be aware that changes to the threshold levels, whether by clicking the "Auto" button or by moving the sliders, only affect the way you see the image. The image data remains unchanged.
Convert your raw darks. Follow step 1 in the cookbook under the title "Create Master Dark" in the "Processing" section to convert the raw dark images to the Iris PIC format. Be sure to name the PIC sequence as described in the cookbook, d for the darks.
Run the script to create the master dark image. In the Iris command window, type the following command:
run 02_make_master_dark N, where N is the number of darks in your image set.
During the master dark creation, you will be prompted with the message "find_hot_dark". The script needs to know a threshold for hot pixel detection in the darks. In the Iris Output window, you will see the statistics for the current image, which is the median-combined dark. As you did with the flat darks, multiply the sigma value times 16 and add it to the mean value, then type the following command:
find_hot cosmetic X, where X is the calculated threshold value.
Iris will analyze the dark image for hot pixels and report the number it found.
Now click the "OK" button on the prompt panel and Iris will continue processing the darks. When finished, it will display a prompt window with the message "Master_Dark_Done!". Click the OK button on the prompt window.
Your master dark image will now be displayed in Iris.
Convert your lights. Follow step 1 in the cookbook under the title "Calibrate Lights" in the "Processing" section to convert the raw light images to the Iris PIC format. Be sure to name the PIC sequence as described in the cookbook, l for the lights.
Run the script to calibrate the images. In the Iris command window, type the following command:
run 03_calibrate N, where N is the number of lights in your image set
Iris will apply the master dark and master flat images to the lights, then de-bayer each calibrated image. When calibration is finished, Iris will display the prompt "Calibration_Done!". Click the "OK" button.
Run the script to register the images. In the Iris command window, type the following command:
run 04_register N, where N is the number of lights in your image set
Iris will register the images. This step may take several minutes. After Iris registers the images, they need to be cropped to remove the non-overlapping edges. Iris will prompt you with the message ""crop_with_window2". The Iris display will show the images stacked together, but chances are they will be very light. Click the "Auto" button on the Threshold panel to better visualize the stacked images. Scroll to the lower left corner of the window and click in the image at a point where all of the stacked images overlap - you will be able to tell from the darkness of the stacked images where that point is. The Output window will show the X and Y coordinates of the point you clicked. Now scroll to the upper right corner of the window and click again, at a point where all of the images overlap. Again Iris will display the X and Y coordinates of the point you clicked in the Output window.
Now type the following command:
window2 ldfrgbreg ldfrgbregcrop X1 Y1 X2 Y2 N, where X1, Y1, X2 and Y2 are the X and Y coordinates of the two points you clicked, and N is the number of light images in your image set
Iris will crop each of the registered image files. Click the "OK" button to close the prompt window. Iris will display the message "Registration_Done!" Click "OK" to close the prompt window.
Run the script to stack the images. In the Iris command window, type the following command:
run 05_stack N, where N is the number of lights in your image set
Iris will stack the images. This step may take several minutes. After Iris stacks the images it subtracts the sky gradient, and then the white balance needs to be adjusted. The de-bayered raw images don't have any corrections applied to the red, green and blue channels, so chances are your stacked image will have a strong green cast. Iris will prompt you with the message "black_then_rgbbalance_1.96_1.00_1.23". With the mouse pointer, draw a small box in an image area that should be black sky, then type the following command in the command window:
black
Then use the rgbbalance command to adjust the white balance by typing the command rgbbalance R G B, where R, G and B are the adjustment ratios for the three color channels. The standard values for a de-bayered image are R=1.96, G=1.00, and B=1.23. Your image may need other values, especially if you used a filter to acquire them, but I recommend using the standard values here. After the processing is complete, you can try further adjustments with the rgbbalance command in Iris, or take the processed image into another application for final adjustments. To use the standard values, type the following command:
rgbbalance 1.96 1.00 1.23
It may help to zoom out (using the icon sixth from the left on the tool bar) and to adjust the visualization threshold by clicking the "Auto" button on the Threshold panel. Then click the "OK" button on the prompt window to resume. Finally, Iris applies a hyperbolic arc-sin (asinh) stretch to the image and displays the final result.
During the execution of this final script, the script saves several versions of the file so that you may go back to them and make other adjustments if you wish. The saved image files are:
stack.pic - stacked result with no further adjustments
You can load any of these images in Iris by typing load <filename> in the command window, where <filename> is the file name from the list above, without the .pic extension.
The script also saves the final result in the Photoshop 16-bit file format, with the file name stack-subsky-wb-asinh.psd. At any time you can save the current image in 16-bit Photoshop format by typing the command savepsd2 <filename>, where <filename> is the name of the file to save, without the .PSD extension. Iris maps it's native data format (-32,767 to +32,767) into the Photoshop 16-bit format (0 to +65,535).
stack-subsky.pic - stacked result with sky gradient subtracted
stack-subsky-wb.pic - stacked result with sky gradient subtracted and white balance applied
stack-subsky-wb-asinh.pic - final result
You can save your images in other formats from Iris too - JPEG, TIFF, PNG, BMP and FITS. In my experience, saving as JPEG and BMP works fine - the current threshold (visualization) values are applied, the data is converted to 8-bits per channel with only positive level values, and the images are saved. When opened in another application they appear just as they did when they were saved in Iris. Saving to TIFF format is different, though. When saving to TIFF from Iris, it is necessary to adjust all pixel levels from the Iris native format of -32,767 to +32,767 to the TIFF format of 0 to +32,767 first. Several Iris commands are useful for this purpose:
stat - returns global statistics for the image. This includes the minimum, maximum, median, mean and standard deviation of the pixel values for each color channel. This command is most useful for deep sky images, in which the median pixel level is often close to the desired black point.
stat2 X1 Y1 X2 Y2 - same as the stat command, but returns statistics only for the image area defined by the specified X and Y coordinates. The coordinates of any point in the image can be obtained by clicking the mouse anywhere in the image, while the image is displayed at 1X scale. The X and Y coordinates and the image intensity level of the point clicked are returned in the Output window. This command is useful for lunar and planetary images in which the background (black sky) level is often well below the minimum pixel value in the lunar or planetary disc.
bg - returns the background intensity level for the image
clipmin X Y - modifies the image in memory, setting the level for all pixels that are less than X counts to Y
offset X - modifies the image in memory, adding the count X to all pixel levels. X can be a positive or negative whole number.
mult X - modifies the image in memory, multiplying all pixel levels by real number X. X can be less than one and greater than zero, resulting in a proportional reduction of every pixel level, greater than one, resulting in a proportional increase in every pixel level, or less than zero, resulting in an inverse (negative) image.
asinh alpha intensity - stretches the displayed image using a hyperbolic arcsin curve to enhance faint details while preserving bright objects. The alpha parameter is a non-linearity factor, where 0 represents a linear stretch and 1 represents maximum non-linearity. Typical values are between 0.001 and 0.1. The intensity parameter is a multiplier to adjust the intensity of the final image, and is usually set between 1 and 50. The final script in my package applies the asinh function to the stacked image after gradient substraction and white balancing, with values of 0.005 for alpha and 30 for intensity. You may experiment with other alpha and intensity values by loading the image stack-subsky-wb and using the asinh function with other values for alpha and intensity.
visu high low - changes the visulalization threshold for the currently displayed image. The pixel intensity values in Iris can range from -32,767 to 32,767. After using the asinh command on a stacked image with a high intensity value (greater than 20), you should use the visu command with a high value of 32,767 and a low value of zero or less. The final script in my package uses the visu command with a high value of 32767 and a low value of -5000, following the asinh command. Note that the visu command does not change the image data, but it DOES affect the results when save an image from Iris to JPEG or BMP formats.
The procedure I use for preparing an Iris image for TIFF conversion is to determine the minimum level that I want to keep, using one or more of the stat, stat2 and bg commmands, then use the clipmin command if necessary to eliminate lower levels, and the offset command to make all remaining pixel levels greater than zero. If the offset command would result in high levels being truncated at the maximum level of 32,767, I use the mult command first, with a value between zero and one, to reduce all pixel levels proportionally.
Download a zip file containing the five scripts